
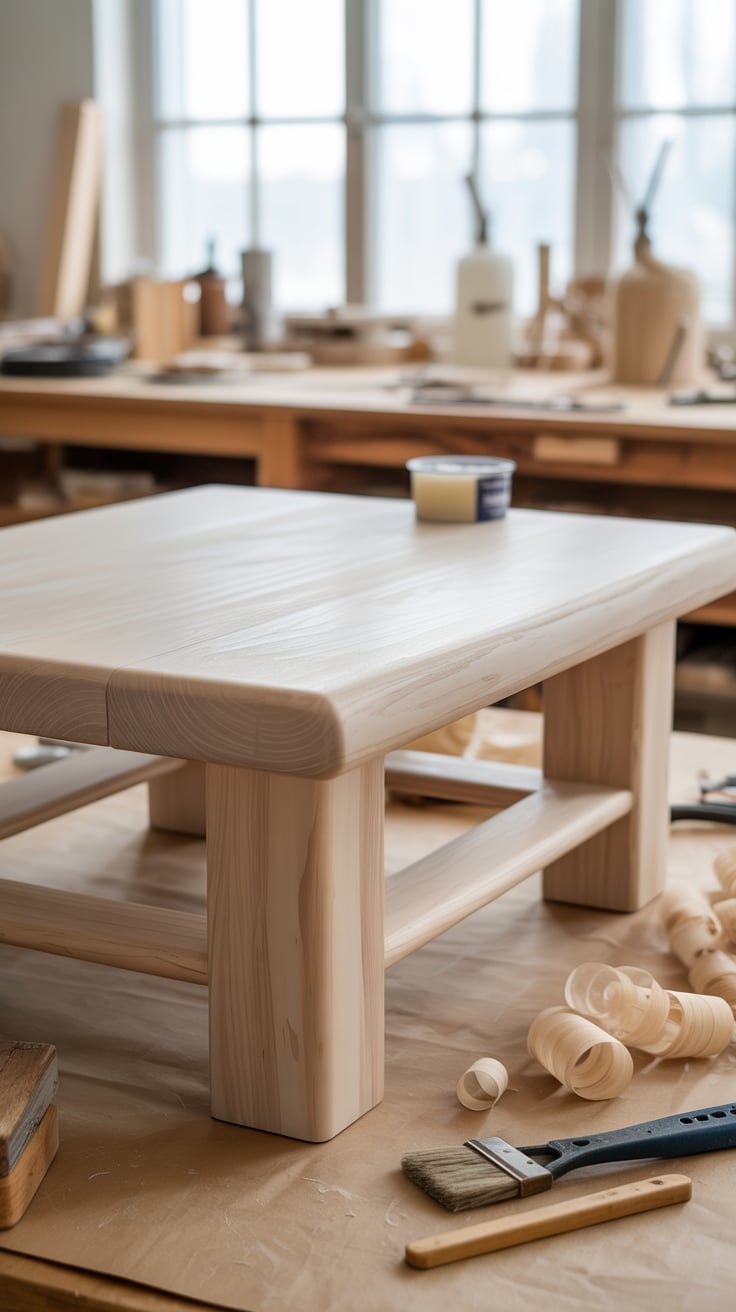
A sanded wood coffee table with white wax delivers the airy, Scandinavian-coastal look many homeowners love—soft grain definition, a matte glow, and a tactile feel that still protects everyday surfaces. Whether you’re finishing a store-bought table, reviving a thrifted piece, or building from scratch, this guide walks you through choosing wood, sanding properly, applying white wax for that limed effect, and maintaining your finish for years.
Start with a plan set to save time and avoid expensive mistakes. See the step-by-step blueprints in TedsWoodworking for coffee tables, joinery, cut lists, and pro tips.
Table of Contents
Why a sanded wood coffee table with white wax looks great and lasts
A white-waxed finish highlights the grain while lightening the overall tone. Unlike opaque paint or heavy white stains, white wax carries pigment into the pores and low grain, leaving the surface itself soft and touchable. The result is modern and organic at the same time.
Visual benefits:
- Grain-forward texture: White pigment nests in open pores (especially oak and ash) to create a limed, coastal effect.
- Soft, natural sheen: Wax cures to a low-luster glow instead of a plasticky gloss.
- Color control: You can dial the white up or down by how heavily you apply and how much you buff off.
Practical benefits:
- Easy maintenance: Small scuffs and minor water marks can be corrected with a quick buff and spot re-wax—no full refinish required.
- Repairability: Unlike thick film finishes, wax repairs blend seamlessly when done patiently.
- Hand-friendly feel: The matte, velvety surface invites daily use.
Considerations:
- Durability: Wax is protective but not industrial. It resists light moisture but needs coasters for hot or wet mugs. You can re-wax high-traffic areas seasonally.
- Wood choice matters: Open-pored species (oak, ash) produce the most dramatic limed look. Closed-pore woods (maple, birch) appear subtler.
- Topcoat compatibility: Traditional wisdom—wax is last. If you need a heavy-duty topcoat, choose a white stain and clear coat instead of waxing afterward.
Styling this finish:
- Scandinavian: Pair white-waxed oak with simple lines and neutral textiles.
- Farmhouse: Use a thicker top, turned legs, and distressed base in soft white or gray paint.
- Modern coastal: Mix white-waxed ash with woven baskets, sisal rugs, and soft blues.
For fast reference on finish behavior and durability fundamentals, see the USDA Forest Products Laboratory’s Wood Handbook (external): U.S. Forest Service.
Materials, wood selection, and tools for a white-waxed coffee table
Choosing the right species and kit upfront is the difference between “nice” and “wow.”
Wood species:
- White oak or ash: Best for a pronounced limed effect; open pores take white beautifully.
- Red oak: Similar to white oak, but the pink undertone can peek through; white wax mutes it.
- Pine: Soft and budget-friendly; yields a soft, chalky white with some blotch risk.
- Maple or birch: Closed grain; the effect is subtle and even, great for minimalists.
- Reclaimed hardwood: Fantastic character; wire-brushing before wax exaggerates the grain.
White wax options:
- Liming wax: Traditional, with white pigment that concentrates in pores.
- White-tinted paste wax: Similar feel; may offer different white/opacity levels.
- DIY tinting: Mix a small amount of white pigment (like titanium dioxide or “whiting”) into a clear paste wax—test samples first.
Other finish supplies:
- Solvent for cleanup: Odorless mineral spirits (check your wax’s solvent base).
- Optional grain accent: Brass or nylon brush to open grain lightly on oak/ash.
- Application: 0000 steel wool (for deeper pore fill) and lint-free cotton cloths for wiping and buffing.
- Dust control: Vacuum with brush attachment, microfiber cloth, or damp rag for pre-wax cleanup.
Tools:
- Orbital sander with 120, 150, 180, and 220-grit discs.
- Hand sanding blocks for edges and end grain.
- Square, tape measure, clamps, pilot drill bits, countersink, wood glue.
- Joinery aids: Pocket hole jig, dowel jig, or mortise-and-tenon setup (your choice).
Safety:
- Dust is hazardous; use a dust mask or respirator (external guidance: OSHA on wood dust).
- Provide ventilation when using solvent-based waxes and cleanup solvents.
Helpful prep reads:
- Finishing basics and surface prep (external): Minwax Wood Finishing Guides.
- Liming wax usage and techniques (external): Liberon Liming Wax instructions.
Build plan and joinery for a solid, stable coffee table
Before sanding and waxing, you need a sturdy build that respects wood movement. Here’s a clean, modern base and slab-style top you can adapt for your space.
Suggested dimensions (adjust to room and sofa scale):
- Top: 48 in L x 24 in W x 1 to 1.5 in thick.
- Height: 16 to 18 in from floor to top.
- Overhang: 1 to 1.5 in past aprons on all sides.
Cut list (example in hardwood):
- Top boards: 4–6 boards, jointed and edge-glued to width.
- Legs: 4 pieces, 2.5 x 2.5 x 16 in.
- Aprons: 2 long aprons at 39 in, 2 short aprons at 15 in; height 4 to 5 in; thickness 0.75 to 1 in.
- Optional stretchers or shelf supports for additional rigidity.
Joinery options:
- Pocket screws: Fast and beginner-friendly. Glue + pocket screws for aprons to legs.
- Dowels or loose tenons: Cleaner look inside; strong and precise.
- Mortise-and-tenon: Classic furniture strength; ideal for heavy use.
Construction steps:
- Mill and glue up the top: Joint edges, orient growth rings for stability, glue, clamp, and flatten. Leave room for final sanding.
- Build the base: Cut legs and aprons; drill pocket holes or lay out mortises/dowels; glue and clamp the base square. Ensure the assembly is perfectly level and square to avoid rocking.
- Attach the top: Use figure-8 fasteners or Z-clips in elongated slots to allow for seasonal wood movement. Don’t rigidly glue or screw through the apron without slots; you’ll risk splits.
Design note:
- For a more dramatic limed look, choose white oak planks with mixed cathedral and straight grain. Quarter-sawn boards deliver striking, ray-fleck highlights once waxed.
Looking for step-by-step plans, cut diagrams, and alternate base designs? Browse TedsWoodworking for coffee table plan sets. Want a compact, organized small-shop workflow with tools arranged for glue-ups and sanding efficiency? See UltimateSmallShop – The Next Woodworking Blockbuster!.
Sanding steps for a sanded wood coffee table with white wax
The “sanded” part is everything. White wax will accentuate grain and flaws alike, so level, consistent sanding matters.
Grit progression:
- Start at 120 if you have planer marks or glue lines; otherwise begin at 150.
- Sand with an orbital sander to 150, then 180, finishing at 220 on face grain.
- For end grain and edges, go one step higher (240–320) to reduce darkening.
Technique:
- Keep the sander flat and moving; don’t tip at edges.
- Vacuum and wipe between grits to remove abrasive dust that scratches at higher grits.
- Mark the surface with a light pencil grid; when the grid is gone, you’ve removed the previous grit’s scratches evenly.
- Hand-sand the last pass with the grain using a fresh 220 sheet to eliminate random-orbit pigtails.
Grain dramatization (optional for oak/ash):
- Light wire-brushing with a brass brush opens softer earlywood; vacuum thoroughly.
- Don’t overdo it—subtle is tastier than deeply grooved.
Edge work:
- Soften sharp corners with a small hand chamfer or a light 220 pass. Wax sits better and the table feels nicer to the touch.
Raise the grain (optional):
- For a buttery finish, lightly mist the surface with water, let dry, and take one more 220 pass. This helps reduce post-finish fuzz.
Glue cleanup:
- Dried glue blocks pigment and wax. Scrape glue squeeze-out before it cures, or spot-sand until the area takes water evenly.
Dust control before finishing:
- Vacuum, then wipe with a microfiber cloth slightly dampened with mineral spirits (or water if using waterborne products). Avoid silicone-laden tack rags, which can contaminate the surface.
For a deeper primer on surface prep, see Minwax’s finishing prep (external): Minwax Wood Finishing Guides.
Applying white wax for a clean, limed effect
White wax sits inside pores and low grain, so the application is different from paint or stain. Think “work in, then wipe back and buff.”
Set up:
- Work in a dust-free space with good ventilation.
- Warm wax spreads easier. If it’s cold, set the can in warm water for a few minutes.
- Stir gently—don’t whip air into paste wax.
Application method A (pronounced white on open grain):
- Optional: Lightly brush the surface across the grain with a brass or stiff nylon brush to open pores.
- Load 0000 steel wool with white wax and rub across the grain first, pressing into pores.
- Immediately follow with with-the-grain strokes to even the film.
Application method B (subtle white cast):
- Apply with a lint-free cloth in thin, even circles, then with-the-grain passes.
- This yields a quieter look with less pigment build-up.
Wipe back and even out:
- After 5–10 minutes (follow your wax’s instructions), wipe back excess with a clean cloth. Adjust the white level by how much you lift off.
- If a spot is too white, dampen a cloth with a little mineral spirits and blend.
Buffing:
- Once the wax flashes and dulls, buff with a clean cotton cloth or soft brush to a low sheen.
- For more sheen, a second buff after an hour is effective; avoid heat from aggressive buffing.
Layering and color control:
- Apply a second thin coat after the first has set if you want more white concentration.
- To pre-tone the wood, use a very light gray or white wash stain before clear paste wax—only if you plan to skip wax pigment. Remember, traditional clear coats don’t adhere well over wax, so choose your system early.
Compatibility and curing:
- Wax is your final step in a wax system. Avoid applying polyurethane, lacquer, or varnish over wax; adhesion is poor.
- If you need a tougher topcoat, use a white stain or toner first, then apply a waterborne clear coat for minimal ambering. Keep wax out of that workflow.
Reference how-tos on liming wax (external): Liberon Liming Wax instruction page.
Protection, maintenance, and repairs for white-waxed tables
A sanded wood coffee table with white wax is easy to live with if you treat it like high-quality leather: gentle care, prompt cleanup, and occasional conditioning.
Daily use:
- Coasters under hot or wet mugs prevent rings.
- Use trays for vases and plants; moisture underneath can leave marks.
- Wipe spills quickly with a slightly damp cloth; dry immediately.
Cleaning:
- Dust with a microfiber cloth. For smudges, use a mild soap-and-water solution on a damp cloth, then wipe dry.
- Avoid silicone sprays and ammonia cleaners; they can contaminate or cloud wax.
Refreshing the finish:
- High-traffic areas benefit from a light re-wax every 3–6 months. Apply a thin coat, wipe back, and buff.
- If the sheen dulls unevenly, a full-surface re-wax brings everything back into balance.
Repairing rings and scuffs:
- White (moisture) ring: Place a cotton cloth over the mark and gently warm with a hair dryer on low, moving constantly; then re-wax the area lightly and buff.
- Light scratches: Spot-wax, let set, and buff. Deeper scratches may need spot-sanding to 220 and a localized re-wax.
- Stubborn stains: Lift gently with mineral spirits on a cloth, re-wax, and buff.
Long-term resilience:
- Expect a natural patina—micro-scratches buff into a soft glow rather than looking like damage.
- If you ever want a more robust finish, strip wax with mineral spirits, sand lightly, and switch to a stain + clear coat system. For film finishes, consult authoritative repair tips (external): This Old House on paste wax and furniture care.
Styling ideas, variations, and eco-friendly options
Style variations:
- Two-tone: White-waxed top with a painted base in warm white, charcoal, or soft sage.
- Parson’s modern: Mitered waterfall edges with continuous grain; white wax keeps it minimal and serene.
- Rustic coastal: Reclaimed oak top with light wire-brushing before waxing; base with slatted shelf for baskets.
- Japandi: White-waxed ash, thin edges, and tapered legs; pair with linen and clay accents.
Color tweaks:
- Cooler white: Choose a neutral to cool white pigment, avoid creams or warm whites.
- Smoky white: Add a hint of gray pigment for a driftwood effect.
- Soft blush: In red oak, layering a faint gray wash before white wax tames pink tones.
Eco-minded finishing:
- Low-VOC waxes and odorless mineral spirits reduce indoor air impact.
- Waterborne pre-coloring (white wash) under clear waterborne finishes minimizes ambering and VOCs if you skip wax.
Budget and time:
- Materials: Wood costs vary widely by species. Wax and supplies are modest compared with multi-coat film finishes.
- Time: Build time 1–2 weekends depending on joinery; finish time 2–4 hours spread over a day for waxing and buffing.
Selling your work:
- White-waxed coffee tables photograph beautifully and sell well in local marketplaces. If you’re exploring profits from woodworking, learn pricing, sourcing, and simple shop systems with WoodProfits.
Troubleshooting common issues and advanced tips
Blotching on softwoods:
- Pine and fir can absorb unevenly. While wax sits mostly on the surface, any pre-color step (like a white wash) can blotch. Use a wood conditioner before stains or keep to wax-only on these species.
- If you do pre-color, sand to 220, condition, then apply a diluted white wash evenly; allow to dry thoroughly before waxing.
Too white or streaky:
- Over-application shows as chalkiness. Wipe back more thoroughly or blend with a mineral-spirits-dampened cloth. Then buff uniformly.
- If streaks persist, let the wax cure, lightly hand-sand with 320, and apply a very thin corrective coat.
Not white enough:
- Use 0000 steel wool application across the grain to drive wax into pores on oak/ash, then wipe back lightly.
- Add a second thin pass targeting areas with shallow pore fill.
Pigtails and swirl marks revealed:
- These appear as circular scratch patterns after waxing. Let the wax harden, hand-sand with 320 until the defect fades, progress to 220 if needed, then re-wax locally.
Water sensitivity:
- Wax resists light moisture but not standing water. Add table rules: coasters, placemats, and felt pads. If you routinely face heavy-use scenarios (kids’ crafts), consider a white stain + waterborne clear topcoat.
Topcoat confusion:
- Remember the rule: wax is last. If you need a topcoat, don’t wax first. For a similar look with higher durability, use a white-toned hardwax oil or a white stain followed by a clear finish. See the Forest Products Lab’s finishing overview (external): U.S. Forest Service.
Shop setup:
- Good dust collection, outfeed support, and finishing space improve results dramatically. Optimize your small shop layout, tool selection, and budget with UltimateSmallShop – The Next Woodworking Blockbuster!.
Recommended resources:
- Plans for alternative bases, waterfall miters, and coffee table storage: TedsWoodworking
- Profitable workflows for small shops: WoodProfits
Conclusion
A sanded wood coffee table with white wax is a satisfying weekend build and a timeless look. Choose the right species, sand methodically, and apply white wax with intention—working pigment into the grain and buffing to a natural luster. Respect the “wax is last” rule, maintain with quick re-waxing where needed, and you’ll enjoy a durable, modern, and repairable finish that pairs with almost any room style. When you’re ready to expand your skills, explore pro-caliber plans and efficient shop setups to keep the sawdust flying and the projects rolling.
FAQ
How durable is a sanded wood coffee table with white wax?
Wax protects against light spills and everyday handling, but it’s not as tough as polyurethane. Use coasters for hot or wet items and wipe spills quickly. The advantage is easy maintenance—minor scuffs and water rings can be spot-buffed and re-waxed without stripping the whole surface.
What wood species work best for a white-waxed finish?
White oak and ash are ideal because their pores hold white pigment for a classic limed effect. Red oak also works but may show a warm undertone. Pine yields a softer, chalky look with potential blotching; maple and birch produce a subtle, even tone due to tighter grain.
Can I put polyurethane over white wax?
No. Film finishes like polyurethane or lacquer typically won’t adhere properly over wax. Decide your system upfront: either use white wax as the final step, or choose a white stain/toner and then apply a clear topcoat for higher durability.
How do I fix water rings on a white-waxed table?
For fresh white moisture rings, place a cotton cloth over the mark and gently warm with a hair dryer on low, moving constantly. Let cool, then apply a small amount of wax, allow it to set, and buff. Stubborn marks may need a light wipe with mineral spirits before re-waxing.
What grit should I sand to before applying white wax?
Finish to 220 on face grain for most hardwoods. Sand end grain and edges to 240–320 to reduce darkening and keep the tone even. Always remove dust between grits and hand-sand your final pass with the grain to avoid swirl marks that wax can highlight.