
Wind spinners are eye-catching kinetic sculptures that add motion, color, and a sense of calm to any yard or porch. In this guide on how to make wind spinners: DIY woodworking project with plans, you’ll learn step-by-step methods, a printable-style cut list, and pro tips to get a smooth, long-lasting spin from simple wood parts and basic tools. Whether you’re building your first spinner or refining a design you’ve tried before, you’ll find everything you need here.
If you’d like thousands of printable woodworking plans to complement this project, check out TedsWoodworking for inspiration, jig ideas, and layout templates that can save time in the shop.
Table of Contents
What you’ll build and how it works
A wind spinner is essentially a balanced set of vanes arranged around a central hub that rotates on a low-friction axle. When wind pushes the vanes, the spinner turns; with the right angles, curvature, and spacing, it’ll rotate smoothly in even light breezes.
You can build many styles:
- Vertical axis spinners: Think classic “pinwheel” or “wheel” styles with blades radiating from a center hub.
- Helical/spiral spinners: Slotted boards that create a corkscrew illusion as they spin.
- Double spinners: Two counter-rotating sets of vanes on the same axle for a mesmerizing effect.
This guide focuses on a robust, beginner-friendly vertical axis spinner with simple vanes you can cut from cedar or pine. You’ll get:
- A core plan sized for a 14–18 inch spinner, great for porches and gardens.
- Scalable dimensions for 10–24 inches.
- Options for upgrading with bearings, protective finishes, and multi-color designs.
Internal balance, smooth axle hardware, and proper weatherproofing are the three keys to success. We’ll cover each in detail so your spinner looks great and spins reliably across seasons. If you’re designing a dedicated workspace for projects like this, a compact, organized shop will make cutting and sanding vanes much more enjoyable; see UltimateSmallShop for practical shop layout solutions.
How to Make Wind Spinners: Tools and Materials
You can complete this project with common DIY tools. Specialty tools (like a band saw or drill press) help, but are not required.
Tools
- Measuring tape, combination square, and pencil
- Jigsaw or band saw (for curves and vane shaping)
- Miter saw or handsaw (for accurate lengths)
- Drill/driver with bit set (1/8–3/8 inch)
- Countersink bit (optional but tidy)
- Sanding block or random-orbit sander (80/120/180 grits)
- Clamps (spring clamps or bar clamps)
- Safety gear: safety glasses, hearing protection, dust mask/respirator
Materials
- Wood for vanes: cedar, redwood, pine, or exterior-grade plywood (1/2–3/4 inch thick). Cedar/redwood resist weather naturally.
- Hub stock: hardwood block or laminated plywood (about 2–3 inches square by 3/4–1 inch thick)
- Axle: 1/4–3/8 inch stainless steel rod or a heavy-duty eye bolt with smooth shank
- Hardware: locknuts, washers, nylon insert nuts, and/or a small sealed bearing and shoulder bolt (optional upgrade)
- Hanging hardware: swivel hook or snap, S-hook, chain or heavy-duty fishing leader swivel
- Exterior finish: exterior paint, marine spar urethane, or penetrating oil
- Adhesives: waterproof wood glue (Type II or Type I), epoxy for hardware reinforcement (optional)
- Spacers: nylon washers (reduce friction and rattle)
Safety notes
- Wear eye and hearing protection. See OSHA’s guidance on eye and face protection for key practices (OSHA).
- Dust from sanding and cutting can irritate lungs; use a dust mask or respirator, especially on softwoods and plywood.
Shop optimization tip: Even in small spaces, a fold-away assembly table and wall-mounted clamp rack speed up repetitive tasks like vane sanding. Resources like UltimateSmallShop can help you plan a compact, efficient setup.
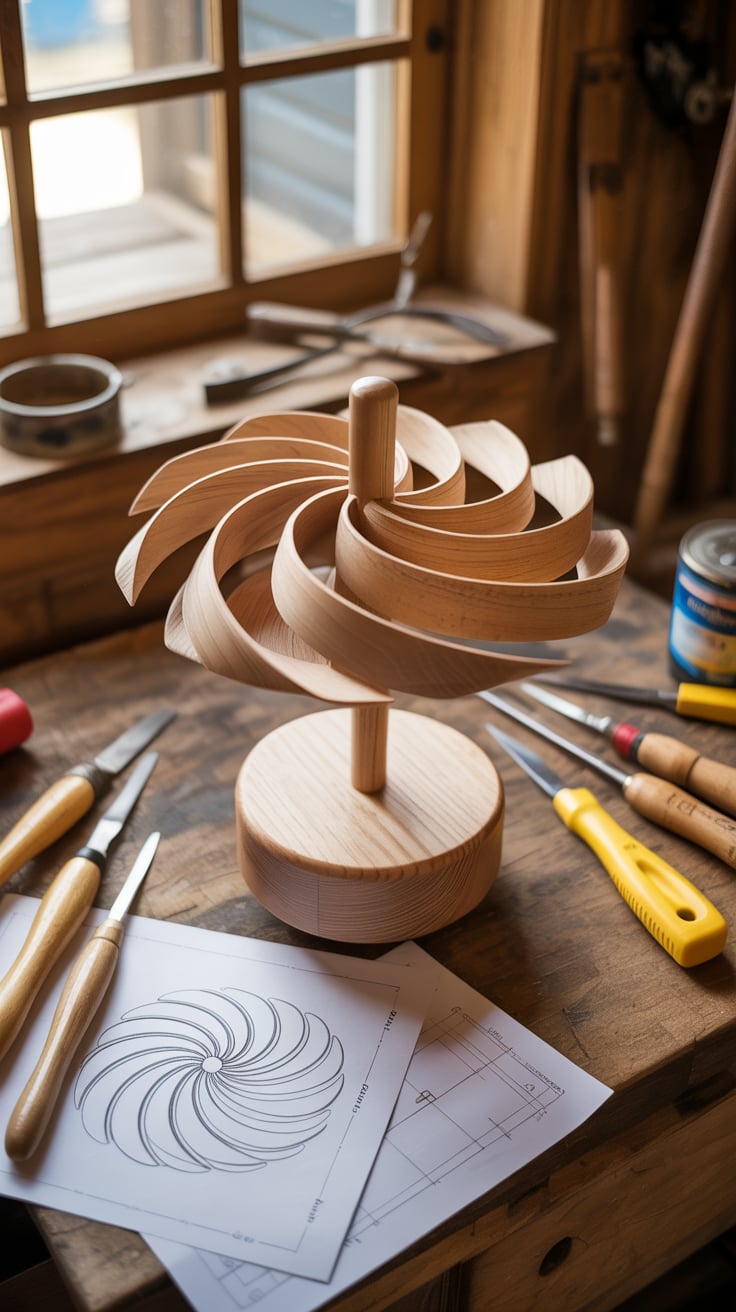
Design decisions and a printable-style plan
Before you cut, decide size, shape, and the kind of motion you want. For the core plan, we’ll build a 16-inch diameter spinner with eight vanes.
Core plan (16-inch spinner)
- Diameter: ~16 inches
- Vanes: 8 identical pieces
- Hub: 2.25 x 2.25 x 1 inch block
- Axle: 5/16 inch stainless steel rod (or 5/16 inch eye bolt with smooth shank)
- Spacers: 2–4 nylon washers
- Hanging: top swivel, chain or wire, bottom counterweight (optional)
Wood cut list (per spinner)
- Vanes (8): 1/2–3/4 inch thick cedar, 2.25 inches wide x 6.5 inches long. Taper to 1.25 inches at the tail; round the leading edge.
- Hub (1): 2.25 inches square x 1 inch thick, center-drilled for axle hardware.
- Accent disc (optional): 3–4 inches diameter, 1/4–3/8 inch thick, to cover hub screws.
Vane profile and angle
- Shape vanes with a gentle taper: 2.25 inches at the root (hub end) narrowing to 1.25 inches at the tail.
- Round over the leading edge slightly to catch wind.
- Set vanes at about 20–25 degrees relative to the plane of rotation for a good balance of torque and speed.
Scaling sizes
- 12-inch spinner: vanes 1.75 inches x 5 inches; 1/4 inch axle.
- 20-inch spinner: vanes 2.5 inches x 8 inches; 3/8 inch axle.
- Double spinner: two sets of 6–8 vanes each, separated by a spacer.
If you want printable plans, cutting templates, and variations like spiral spinners, a plan library such as TedsWoodworking can supply ready-to-print patterns and jigs so your parts match perfectly.
Step-by-step cutting and shaping of vanes
- Break down stock
- Mill or cut your board into vane blanks according to the cut list. If using a single cedar fence board, rip to width (2.25 inches) and crosscut to length (6.5 inches).
- Keep grain direction consistent to improve balance and reduce warping.
- Lay out the taper and profile
- On each blank, mark a taper from 2.25 inches at the root to 1.25 inches at the tail.
- Add a gentle curve to the trailing edge if you want a more sculpted look.
- Cut the taper
- Use a miter saw for square ends first, then a jigsaw or band saw to cut the taper and any curves.
- Cut slowly to reduce tear-out. Support the piece close to the blade for accuracy.
- Round the leading edge
- With a sander, round over the leading edge of each vane to a soft 1/8 inch radius. This helps catch wind while minimizing turbulence.
- Lightly ease all edges to reduce splinters and improve paint/finish adhesion.
- Drill mounting holes
- At the root end, mark a centerline. Drill a pilot hole 3/4–1 inch from the root edge. Diameter depends on your mounting screw (e.g., #8 or #10 wood screw).
- For hub-mounted designs using through-bolts, drill clearance holes sized to your bolts through both vane and hub faces.
- Sand smooth
- Sand 80 → 120 → 180 grit. The smoother the vane surfaces, the quieter the spinner.
- Keep pairs of vanes near identical. If one vane is heavier, sand it a bit more to balance later.
- Optional vane variations
- Cut a scallop or swoop into the tail for a decorative silhouette.
- Add shallow grooves to the leading face to catch light and create sparkle.
- For color-block designs, pencil light paint boundary lines now; it’s easier before assembly.
Safety tip: Use a sharp blade and maintain a firm grip when cutting small parts. A simple auxiliary fence or small parts sled can keep fingers clear of the blade.
Hub, axle, bearings, and assembly
A solid hub and low-friction axle make the difference between an ornament and a real kinetic sculpture.
Hub prep
- Cut a 2.25 x 2.25 x 1 inch hub from hardwood or high-quality plywood.
- Mark the center on both faces; drill a straight center hole to fit your axle or eye-bolt shank (e.g., 5/16 inch). A drill press increases accuracy, but a hand drill with a guide block works.
- Optional: Drill shallow pilot holes on the hub face where each vane will mount (every 45 degrees for 8 vanes).
Axle options
- Eye-bolt axle: Use a stainless 5/16 inch eye bolt passing through the hub; secure with a washer and nylon locknut on the bottom. The eye gives you a convenient hanging point.
- Rod axle with bearing: Use a 5/16 inch stainless rod as a spindle with a small sealed bearing press-fit in the hub. Add a shoulder bolt or threaded rod to hang the bearing assembly. This spins effortlessly but requires precise drilling.
Assembly sequence
- Dry fit: Clamp the hub in a vise, insert the axle, and mock-up vane placement to check spacing and angle.
- Vane angle jigs: A simple plywood ring with 8 marks at 45 degrees helps keep vanes evenly spaced. A 20–25 degree wedge under each vane sets angle consistently.
- Mount vanes: Pre-drill the hub as needed. Attach vanes with exterior-grade screws (stainless or coated). A dab of waterproof glue increases durability, but avoid squeeze-out that could foul the axle.
- Balance check: Suspend the spinner by the axle eye or top hook. If one side dips, lightly sand a vane or add a discreet washer on the light side’s opposite vane until level.
- Spacers and friction control: On the axle above the hub, place a nylon washer; repeat below the hub if the hub contacts hardware. This reduces friction and protects the finish.
- Hanging hardware: Attach a swivel hook or fishing leader swivel to the top so the spinner can rotate freely and avoid wire twist. Consider a short length of chain for clearance from eaves.
Double-spinner variant
- Stack a second hub-and-vane assembly on the same axle with a 1–2 inch spacer between them. Angle the second set of vanes in the opposite direction for counter-rotation.
Pro resource: For fixture ideas (jigs, drilling guides, sanding blocks) that keep everything square and repeatable, browse TedsWoodworking. It’s a time-saver when you want consistent, balanced parts.
Weatherproof finishes and color design
Outdoor exposure is tough on wood. A good finish serves three purposes: it resists moisture, protects from UV, and delivers color.
Finish options
- Paint + clear topcoat: Prime with an exterior primer, then apply 2–3 coats of exterior enamel or acrylic. Finish with a marine spar urethane for added UV and moisture resistance. This combo offers the best longevity and bold color.
- Stain + spar urethane: For natural wood grain, use an exterior stain and top with 2–3 coats of marine spar urethane. Re-coat annually for best results.
- Penetrating oils: Easy to apply, great for cedar/redwood. They require more frequent maintenance and won’t protect as long as a film finish.
Application steps
- Seal end grain: Vanes take on water mostly through end grain. Prime or seal these areas thoroughly.
- Finish before final assembly: Painting or finishing vanes separately helps you reach edges and keep hardware areas clean.
- Light sanding between coats: A 220-grit scuff yields a smoother final coat and better adhesion.
- Cure time: Let finishes cure fully before hanging, per manufacturer guidance.
Color ideas
- Gradient vanes: Paint vanes in a gradient (light to dark) around the wheel to emphasize rotation.
- Two-tone contrast: Alternate colors for high visibility. Complementary pairs (e.g., blue/orange) are striking.
- Metallic accent disc: A small center disc in metallic paint draws the eye and hides screw heads.
Longevity and maintenance
- Annual rinse and re-coat: Clean with mild soap and water; apply a fresh coat of spar urethane if the sheen dulls.
- Hardware check: Tighten loose screws and check swivels and hooks for rust. Replace if necessary.
For evidence-based finishing tips, see the U.S. Forest Products Laboratory’s guidance on finishes for exterior wood (U.S. Forest Service). University extension resources also offer practical advice on outdoor wood coatings (Iowa State University Extension).
Tuning, placement, and ongoing care
To maximize spin, minimize friction, balance the assembly, and give it clean wind.
Balancing tips
- Static balance: Hang the spinner from its top swivel and let it rest. If it drifts to a heavy side, mark the low vane and remove material subtly with 180–220 grit sanding or add a small washer opposite.
- Dynamic balance: If the spinner vibrates at speed, slightly adjust opposing vanes or add thin nylon washers where needed.
Friction reduction
- Use nylon or Teflon washers where the hub meets hardware.
- Keep the swivel clean and lubricated with a dry Teflon spray if it squeaks.
- If you used a bearing hub, avoid over-tightening the shoulder bolt; snug plus a quarter turn is typically enough.
Placement
- Height: 6–9 feet off the ground gives clean air and visibility.
- Clearance: Provide 18–24 inches of free space around the spinner to avoid collisions with walls or branches.
- Wind exposure: Ideal locations get steady breezes but aren’t turbulent. Eave corners, pergola edges, or freestanding poles are excellent.
Seasonal care
- Remove during severe storms or heavy icing to extend life.
- In snowy climates, store over winter and re-hang in spring after a quick inspection.
Enjoy the build? If outdoor projects are your thing, consider building matching planters, a trellis, or even a garden shed. A curated plan set like My Shed Plans can help you scale up to more ambitious yard projects that coordinate with your spinner design.
Authoritative references for safety and durability:
- OSHA Eye and Face Protection Basics (OSHA)
- U.S. Forest Products Laboratory: Finishes for Exterior Wood (U.S. Forest Service)
- Iowa State University Extension: Exterior Wood Finishes (ISU Extension)
Plans and variations you can build next
Once you’ve built the core 16-inch spinner, try these variations. The dimensions below keep the build approachable while adding new visual effects.
- Compact porch spinner (12 inches)
- Vanes: 8 pieces at 1.75 x 5 inches, tapered to 1 inch at tail.
- Hub: 2 x 2 x 3/4 inch.
- Axle: 1/4 inch eye bolt; nylon washers top and bottom.
- Finish: Two-tone paint; high-contrast stripes.
- Note: This size spins easily in light breezes and is perfect under eaves.
- Classic helix slat spinner (18 inches x 24 inches overall)
- Panel: Start with a 4 x 24 inch cedar board; mark equally spaced diagonal slots (about 3/8–1/2 inch apart) that stop 1/2 inch from the opposite edge. Alternate the stop edge to create a helical illusion when twisted.
- Center rod: 1/4–5/16 inch stainless rod through the top and bottom, with spacer beads or washers between slats.
- Twist: Gently twist the slatted board into a helix before locking in place with top and bottom caps.
- Hanging: Single top swivel. This design creates beautiful motion with minimal wind.
- Double pinwheel (two 14-inch wheels)
- Build two wheel assemblies with 6 vanes each.
- Axle: Single 3/8 inch rod or eye bolt with a 1–2 inch spacer tube between wheels.
- Vane angle: Oppose angles for counter-rotation. Paint wheels in complementary colors.
- Tip: Add a small tail vane to encourage directional facing in variable winds.
- Mixed-media upgrade
- Add thin aluminum or acrylic vane caps for sparkle and stiffness.
- Use a decorative turned wooden finial as a center accent.
- Epoxy in a sealed miniature bearing for ultralow friction on larger builds.
Templates and ideas: A plan collection like TedsWoodworking provides printable patterns for vane shapes, jig plans for drilling consistent angles, and spacing guides for double spinners. If you want to turn your hobby into a side hustle, resources such as WoodProfits can help you assess pricing, safety labeling for outdoor decor, and craft show selling tips.
Conclusion
With a few boards, basic hardware, and the guidance above on how to make wind spinners: DIY woodworking project with plans, you can create an outdoor piece that moves gracefully and lasts through the seasons. Focus on consistent vane shaping, a smooth-running axle, balanced assembly, and a durable finish—those four factors deliver the mesmerizing spin you’re after. As you refine your design or scale up to multi-spinner builds, consider leveraging plan libraries like TedsWoodworking and shop-setup guides like UltimateSmallShop to work smarter, safer, and faster.
FAQ
What is the best wood for a wind spinner?
Cedar and redwood resist weather and are easy to shape. Exterior-grade plywood also works well if edges are sealed thoroughly.
How big should the vanes be for a 16-inch spinner?
A good starting point is eight vanes at roughly 2.25 x 6.5 inches, tapered to about 1.25 inches at the tail, with a 20–25 degree angle at the hub.
Do I need bearings?
Not strictly. A stainless eye bolt axle with nylon washers spins well. A sealed miniature bearing offers smoother rotation, especially for larger 18–24 inch spinners.
How do I waterproof a wooden wind spinner?
Prime, paint with exterior paint, and top with marine spar urethane. For a natural look, use exterior stain plus spar urethane. Re-coat annually for best results.
Is there a plan I can print for how to make wind spinners?
Yes—use the dimensions in this guide to sketch a full-size template, or explore ready-to-print patterns in collections like TedsWoodworking.