
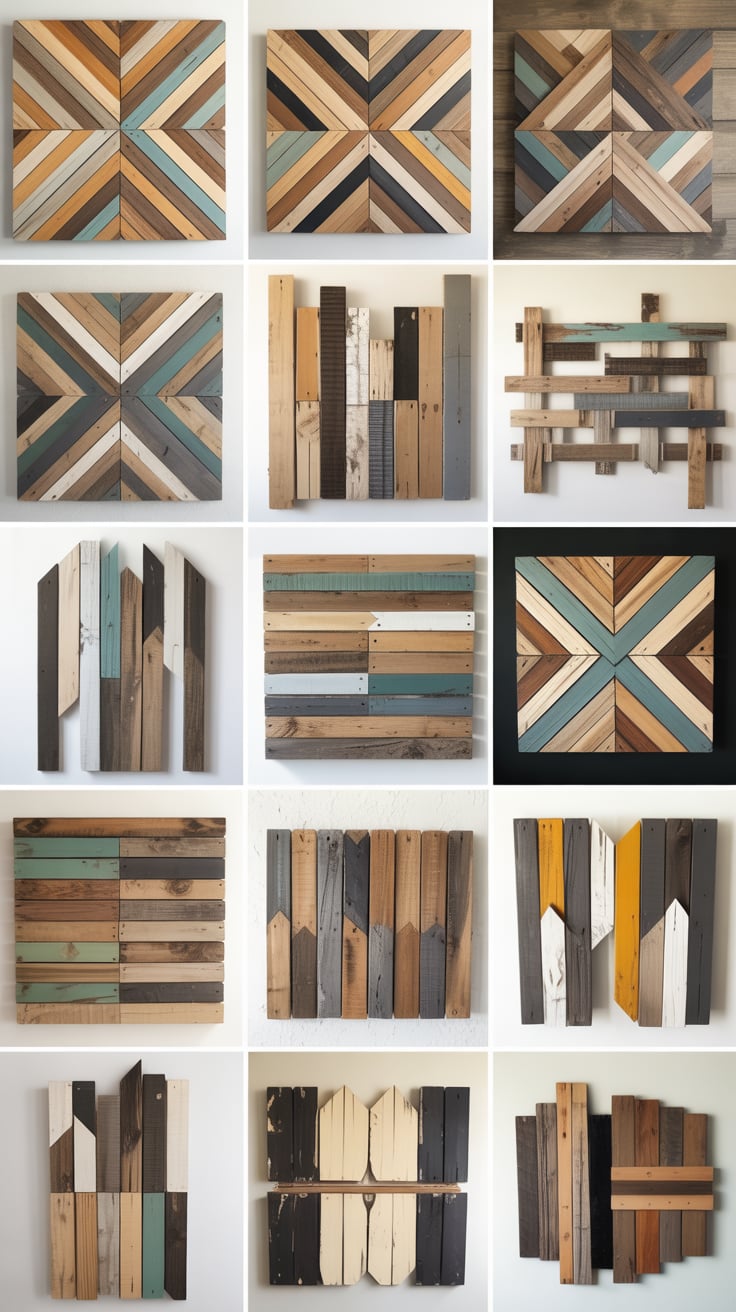
Transform leftover lumber into statement pieces that spark conversation, style, and sustainability. This curated collection of 14 unique scrap wood wall art ideas blends design principles with practical build tips so you can turn offcuts into gallery-worthy decor—without overspending. If you prefer following step-by-step woodworking plans instead of designing from scratch, explore the massive project library inside TedsWoodworking for inspiration you can adapt to scrap-friendly builds.
Use these ideas as a flexible framework—mix species, colors, thicknesses, and textures to match your space. We’ll cover layout tricks, finishing options, mounting solutions, and safety throughout.
Table of Contents
Geometric mosaics and modern herringbone showstoppers
Bring order to the randomness of scrap piles with two classic, high-impact compositions.
Idea 1: Geometric offcut mosaic panel
- Concept: Cut scraps into triangles, trapezoids, and parallelograms, then assemble them in a repeating or freeform mosaic. Think quilt-like geometry with wood grain as your “fabric.”
- Materials: Assorted hardwood and softwood scraps, thin plywood backer, wood glue, painter’s tape, brad nails (optional), clamps.
- Build tips:
- Rip and crosscut pieces to common thickness for a flush surface. A simple jig on your miter saw ensures consistent angles (30°, 45°, 60°).
- Dry-fit patterns on the backer sheet. Use painter’s tape on the front to hold sections together before gluing to the backer.
- Keep glue squeeze-out minimal to reduce sanding.
- Finish: Clear oil-poly to unify mixed species, or use a satin waterborne poly for a lighter, modern look. Mask certain pieces and add a pop of color for contrast.
- Mounting: A French cleat keeps large panels flat and secure.
Idea 2: Herringbone or chevron wall art
- Concept: Stagger similarly sized strips in a herringbone or chevron layout inside a simple frame.
- Materials: Scrap strips (12–24 in), backer board, miter saw, glue, finish nails.
- Build tips:
- Mill strips to the same width. Start the pattern from the centerline to keep symmetry.
- Square the panel edges, then add a mitered border for a clean, furniture-grade look.
- Finish: Dark walnut oil on select pieces juxtaposed with natural ash or oak yields a luxe, boutique feel.
- Size: Works from 18×24 in to full accent walls—scale the strip length accordingly.
Design note: These scrap wood wall art ideas benefit from contrast—pair light and dark species, mix flatsawn and quartersawn figure, and vary block sizes to add rhythm and depth.
External references: For finishing fundamentals, see How To Use A Speed Square – The Beginners’ Guide
Live-edge constellations and layered topographies
Bring nature’s contours indoors with compositions that celebrate organic edges and varied thickness.
Idea 3: Live-edge “constellation” scatter
- Concept: Cluster small live-edge slices like star groupings across a painted or stained backer.
- Materials: Thin end cuts, cookies, or live-edge fragments; backer; glue; spacers to float pieces off the surface.
- Build tips:
- Arrange the “stars” in arcs and clusters. Keep odd-number groupings; use negative space intentionally.
- Add 1/8–1/4 in spacer blocks under select pieces to create shadows and depth.
- Finish: Oil the slices to bring out figure; matte-paint the backer for contrast.
- Mounting: French cleat for large panels. For multiple small panels, D-rings and anchors work well.
Idea 4: Layered topography map
- Concept: Stack layers of plywood or mixed species to mimic contour lines on a map or a stylized landscape.
- Materials: Template printout, jigsaw or bandsaw, plywood/hardwood scraps, sandpaper, wood glue.
- Build tips:
- Trace contour lines onto scraps. Cut and label each layer, then sand edges to soften steps.
- Offset grain direction per layer for visual interest.
- For a coastal theme, add a painted “water” base layer with higher layers in natural wood tones.
- Finish: Keep finishes matte or satin to emphasize sculptural form over gloss.
- Mounting: Hidden keyhole hardware or a cleat to keep it flat.
Safety: Sanding uneven surfaces creates dust. Wear a respirator and use dust collection; wood dust can be hazardous.
Color gradients and honeycomb tile panels
These two scrap wood wall art ideas play with modular repetition and controlled color for high visual impact.
Idea 5: Color-gradient slat panel
- Concept: Thin slats arranged in a vertical or horizontal gradient—from natural to stained tones or from light to dark species.
- Materials: Uniform slats (e.g., 1/4–3/8 in thick), backer, glue, finish.
- Build tips:
- Pre-finish slats before glue-up to keep color transitions clean.
- If using stains, mix test boards for intermediate tones. Note label each slat’s position to maintain the flow.
- Finish: Waterborne clear coat preserves color accuracy; oil can shift warm tones.
- Styling: This approach pairs beautifully with modern, minimal interiors.
Idea 6: Hexagon “honeycomb” tile wall art
- Concept: Create a field of hex tiles from scrap strips cut to 30° mitered segments; assemble into a honeycomb, then mix species for a natural checkerboard.
- Materials: Scrap strips milled to consistent width, miter saw with stop block, backer.
- Build tips:
- Cut six identical pieces per hex; use a band clamp or painter’s tape loop to assemble each cell.
- Vary thicknesses to create 3D relief pockets; leave some cells empty for negative space.
- Inlay small accent tiles (brass/aluminum offcuts or resin) for sparkle.
- Finish: Satin clear keeps the geometry crisp; black-painted backer makes the pattern pop.
- Mounting: If the piece is heavy, split it into modular panels joined on the wall.
Shop setup note: Working with many repeat cuts is easier in a tidy, efficient space. If you’re outfitting or optimizing a compact workshop, UltimateSmallShop shares practical layouts, space-saving tool stations, and budget-minded setup ideas.
Botanical inlay and negative-space typography
Art that layers storytelling into craft—perfect for gifts and statement entryways.
Idea 7: Framed botanical inlay from veneer offcuts
- Concept: Use thin scraps or veneer offcuts to “paint” leaves and stems inside a frame, echoing marquetry.
- Materials: Veneer or thin hardwood, craft knife, fine-tooth saw, backer panel, veneer tape.
- Build tips:
- Sketch or print a silhouette of your botanical subject; cut pieces like puzzle parts.
- Keep grain direction purposeful: leaf veins parallel; stems vertical; petals fanning out.
- Tape the front, glue to the substrate, and press flat during cure.
- Finish: Shellac and wax or waterborne lacquer to protect delicate edges.
- Frame: A thin mitered frame in contrasting wood will elevate the art.
- Reference: For historical context on inlaid wood techniques, see Britannica – Intarsia.
Idea 8: Negative-space typography sign
- Concept: Instead of gluing letters on top, cut letter-shaped openings from a board and back them with interesting scraps laid mosaic-style.
- Materials: Front board (ply hardwood), assorted offcuts, scroll saw or jigsaw.
- Build tips:
- Lay out bold, sans-serif letters for readability at distance.
- Back the cutout panel with a field of colorful scraps arranged in random lengths and heights.
- Aim for tight seams at the letter edges; a flush-trim bit cleans up slight overhangs.
- Finish: Matte black face panel with natural wood backing yields striking contrast.
- Mounting: Z-clips or cleat as needed for size.
Pro tip: Before final assembly, stage options on the shop floor and take photos. The camera reveals balance issues you might miss in person.
Sunburst medallions and skyline silhouettes
These ideas bring motion and narrative to your walls.
Idea 9: Sunburst medallion from tapered wedges
- Concept: Radial pattern of tapered segments meeting at a center medallion.
- Materials: Mixed species wedges, circle backer, compass jig for layout, clamps.
- Build tips:
- Cut identical wedges with a tapering jig. Alternate light/dark pieces for rhythm.
- Glue up in halves, then join halves to reduce panic during clamp-up.
- Cover the center with a round plug, tile, or brass disc for a polished finish.
- Finish: Hand-rubbed oil or hardwax oil enhances grain chatoyance in radial layouts.
- Size: 24–36 in diameter makes a dramatic centerpiece above a credenza or bed.
Idea 10: Mountain skyline from reclaimed planks
- Concept: Layer scrap planks to form a stylized mountain range or city skyline.
- Materials: Reclaimed boards, jigsaw, backer, stains/paints for depth.
- Build tips:
- Cut overlapping silhouette layers: foreground darkest, background lightest (aerial perspective).
- Stagger elevation and thickness to cast natural shadows.
- Add a “sun” or “moon” disk made from a contrasting species or painted circle.
- Finish: Washes of diluted paint preserve grain while differentiating layers.
- Mounting: For a long, narrow piece, install two cleats to prevent bowing.
Eco angle: Scrap art reduces waste and the need for new materials. If using finishes, choose low-VOC options and ventilate well.
End-grain pixel portraits and floating block sculptures
Turn small offcuts into bold relief artwork with tactile dimension.
Idea 11: Pixel art portrait from end-grain cubes
- Concept: Crosscut small cubes, then place them like pixels to render a portrait or abstract.
- Materials: End-grain cubes (3/4–1 in), color key (grayscale or limited palette), backer.
- Build tips:
- Use contrasting species to create tonal values: maple (light), cherry (mid), walnut (dark).
- Sand faces minimally to keep crisp end-grain “sparkle.”
- Elevate select cubes by 1/8–1/4 in for a 3D pixel effect.
- Finish: Oil amplifies end-grain warmth; test on scraps to avoid excessive darkening.
- Time-saver: Start with a small 12×12 grid before tackling larger portraits.
Idea 12: Floating block stack sculpture
- Concept: A matrix of mixed-thickness blocks mounted on hidden standoffs so each piece appears to float.
- Materials: Blocks of varying thickness/species, dowels or aluminum spacers, backer board, epoxy or CA glue.
- Build tips:
- Drill shallow, matching holes in blocks and backer; insert dowels as standoffs.
- Angle a few blocks slightly to catch light differently across the piece.
- Keep a consistent margin between blocks (use spacers for speed).
- Finish: Satin or matte to emphasize form over sheen.
- Mounting: French cleat for larger works; ensure standoffs are robust and evenly distributed.
Workflow tip: Pre-sort scraps by thickness, species, and length. A labeled bin system speeds builds and reduces visual clutter. For more efficient small-shop layouts and jigs, check out UltimateSmallShop.
Kinetic waves and sculpted intarsia wildlife
Add motion or wildlife storytelling with advanced, show-stopping techniques.
Idea 13: Kinetic wave or chevron flip panel
- Concept: A louvered panel where angled slats reveal one pattern when viewed from the left and another from the right.
- Materials: Identical slats with mitered edges, frame, backer, contrasting finishes for each slat face.
- Build tips:
- Cut slats consistently and set a uniform tilt angle (e.g., 20°).
- Paint/stain alternating long faces in different tones or patterns.
- Mount slats into a notched frame to keep geometry consistent.
- Finish: Satin lacquer for quick build-up and durability.
- Result: Viewers moving across the room see the art subtly change—guaranteed double-take.
Idea 14: Intarsia bird or fish from mixed species
- Concept: 3D “puzzle” of individually shaped pieces that form a lifelike wildlife scene—perfect for showcasing species contrast.
- Materials: Mixed species scraps, scroll saw/bandsaw, carving tools, sanding drums, backer.
- Build tips:
- Select species by value and temperature: maple for highlights, walnut for shadows, cherry for midtones.
- Slightly bevel mating edges for tight seams; sculpt contours with rasps for dimension.
- Keep pieces organized in trays and mark grain direction.
- Finish: Oil or hardwax enhances shape and grain without plastic sheen.
- Time: More advanced than most ideas but undeniably “speechless” material once finished.
Health note: Wear hearing and respiratory protection and keep dust controlled with proper PPE and ventilation.
Quick planning blueprint for your first build
- Choose a theme: geometry, nature, typography, motion, or portrait.
- Inventory your scraps: species, thicknesses, and sizes inform the design.
- Decide on scale: start with 18×24 in panels before committing to wall-sized installations.
- Mockup: lay pieces on a backer and photograph variations.
- Finish tests: try small swatches to lock in sheen and color before assembly.
- Mounting: size dictates hardware—D-rings for small, French cleats for medium/large. See [DIY French cleat wall](INTERNAL LINK PLACEHOLDER).
Turn your hobby into a side income
If friends and guests are already asking for commissions, it might be time to build a small revenue stream from your art. WoodProfits outlines straightforward approaches to pricing, product selection, and selling locally or online—useful if you want a simple roadmap without guesswork. Pair that with a compact, efficient shop to increase output without expanding your footprint: UltimateSmallShop.
Recommended resources for designs and shop setup
- For adaptable plans and patterns you can translate into scrap-friendly builds: TedsWoodworking.
- For maximizing a small workspace and organizing repeatable jigs/cut stations: UltimateSmallShop.
- For turning your builds into a side hustle with practical guidance: WoodProfits.
Conclusion
From geometric mosaics to kinetic wave panels, these 14 unique scrap wood wall art ideas prove that leftovers can become luxury—artful pieces that draw eyes and start conversations. Choose a theme that suits your room, pre-plan your layout, and finish thoughtfully. Whether you’re crafting a small entryway accent or a wall-filling centerpiece, scrap wood can deliver the texture, warmth, and originality that leaves guests speechless. If you want project plans and shop organization guidance to speed up the process, browse TedsWoodworking and optimize your space with UltimateSmallShop.
FAQ
What tools do I need for scrap wood wall art?
A miter saw or circular saw, sander, clamps, and a square cover most builds. A jigsaw or scroll saw helps with curves and cutouts.
How do I mount heavy scrap wood wall art securely?
Use a French cleat sized to your panel width and check wall studs. For medium pieces, heavy-duty D-rings and anchors work. Larger panels benefit from cleats for leveling and support.
What finishes are best for mixed-species panels?
Clear oil-poly or waterborne poly works well. Test on scraps to ensure color consistency across species. For more detail, see the USDA FPL finishing guide.
How can I make the colors pop without paint?
Leverage natural contrast: maple, ash, and birch for light tones; cherry mid; walnut and stained oak dark. End-grain cubes intensify color naturally in pixel art.
How do I prevent panels from warping?
Glue up on a stable backer, seal both front and back, and use proper mounting (cleats) with wall spacers to allow seasonal movement.
How do I price and sell my pieces?
Track materials, hours, and finish costs, then add a margin based on local demand. For a practical roadmap, consider WoodProfits.
Can beginners make these scrap wood wall art ideas?
Absolutely. Start with herringbone, mosaics, and skyline silhouettes. Build skill toward topography layers, intarsia, and kinetic panels. If you’d like guided plans, explore TedsWoodworking.